Deployable Plugins
Plugins can be deployed as simple HTTP servers. The platform takes care of deployment, scaling the number of instances, re-deploying models based on new data, recovering from failures and more. Deployable plugins can be built using popular HTTP server libraries such as Flask for Python.
Configuring plugin as deployable
To make your plugin deployable, one of the plugin JSON result stages needs to output an object with key http on the root object. This can be added to the output JSON from the initial stage or any additional stage. If multiple stages output an http results object, the one from the last stage will be taken. You can also provide each one of those at different stage, for example port, statusPath and requestPath at the initial stage, while explain and options can be provided at other stages. They will be merged together, and the last one overrides a previous one.
Here is a basic http object specification that is added on the trainMore stage:
As can be seen in the example above, the http object is pretty straightforward:
- port: specifies that port the http server is running on, in this case 5000. This can be seen from the actual command to start the http server, specfiied in
startServerCmd. - statusPath: the path that will be called with a
POSTto check if the http server has finished setting up during deployment, or once deployed to reqularly monitor its health. Return a200http status code if all is still good, any other http code will result in a automatic re-deployment. - startServerCmd: The actual command that will be executed to start your http server. By default Flask is available, so that is used to start the http server a specified in
server.py, as well as port 5000. Important is that the server needs to listen on all addresses, which is usually specified with thelisten on 0.0.0.0option. - requestPath: The path that will be called whenever a request is routed to this plugin's http server. Will always be
POST, so make sure this route handlesPOSTrequests. - options: This object will be passed on to the manifest of the server stage. This way you can easily share parameters from for example the model training stage with the server stage.
- explain: This object describes input and output of the end-points in a friendly way for the end-user. More on this below in the
Deployment end-point explanationsection below.
Deployable plugin manifest
When a plugin is deployable, it again receives a JSON manifest for the plugin to read, just like in any other stage such as the initial one.
During local development, get your server stage manifest by doing a GET like this — note that the last path for the stage stage needs to be server:
Store the results in a file called server-manifest.json, as we'll use it in the next step to the launch plugin's server.
Here is what the JSON manifest will look like:
First note that the stage will always be server for the deployable part of plugins. Basically when the plugin loads the JSON manifest, and it finds that manifest.stage == 'server' we simply start the http server in our plugin code.
The main difference with a manifest for the initial and additional stages is that there is no getUploadUrls and no dataUrls. This means that in the server stage it is not possible to upload data to plugin storage or to query any datasets. You can only download files uploaded to storage from previous stages using the downloadUrls.
The options object is an exact copy of what was specified in the previous stage under the http object. The metadata is the exact same object as for any previous stages.
Both the statusPath and requestPath as specified above should be able to receive a POST request with a JSON object as body. The JSON object will look like this:
The property now is automatically supplied and is the timestamp of the request. user_created is a custom property that was sent by the end-user of your plugin, because your deployment plugin explanation requested that field — more later on this below in the "Deployment end-point explanation" section. Often the difference between now and user_created is used to calculate seconds since user creation, which is often an important feature in prediction models.
Then each feature_* property maps 1-on-1 with the ones from metadata.features in the JSON manifest. Many of those features are auto-detected by the platform during request time, to that the end-user integrating your plugin doesn't have to supply them manually.
Request & response handling
A deployable plugin should return a valid JSON object as response body, as well as a 200 http code. If the request cannot be handled, returning anything else than 200 will be considered an error.
Once you're ready to test your plugin server, start it with the command below where $START_SERVER_CMD is the command you've specified in the plugin results JSON under http.startServerCmd:
An important difference with regular plugin runs is that we use the environment variable MANIFEST_FILE to supply the JSON manifest — server-manifest.json in this case. This is because the way to start a http server, such as Flask, doesn't allow for command line arguments that pass through the JSON manifest in a consistent way. The other environment variable is LOG_FILE, which can be written to, and shoul be mostly used for error logging, which can be looked up from the Stormly front-end using a log viewer.
Note that it is recommended to not rotate the log file but to truncate it to keep it to a maximum of 1GB — consult your language API for specifics. If you do rotate, keep a maximum of 1 rotated log file and then throw it away. This is to prevent the deployment instance from running out of diskspace or having degraded performance due to ever growing log files.
It's important to read the environment variables MANIFEST_FILE and LOG_FILE unmodified as-is. For production deployments on the platform these paths will be in different locations.
Once your server is running it's time to send your first request. We use the same format as above for the JSON with props and features — during development you need to supply all those manually, but when your plugin is deployed on the platform this is automatic:
Above command performs the status check on the status end-point specified in http.statusPath. The actual request end-point — /predict in this case — gets the exact same JSON request body. The difference is that the status check JSON request body is constructed using the most common value for each feature_*, while for the request end-point it uses the actual properties for the current user.
If both the status and request end-points return a 200 success, your plugin is ready to be used on the platform. An additional step — which is highly recommended if you make your plugin publicly available — is to describe additional inputs for your plugin request, as described in the next section.
Deployment end-point explanation
A basic explanation for a deployable plugin should at least include an example of the possible JSON reponse bodies it can output — as specified in the output object under explain. This can be specified by an array, where each element in the array is 1 example JSON response body. See the http.explain JSON object below in the full JSON http example.
The specified output explanation is visualized on the platform to the end-user as follows:

It's also recommended to explain the input parameters — as defined by the props object, see previous section. For each item under inputs a few things can be specified:
- required: Optional — defaults to true
- importance: Optional — ranging from 0.0 to 1.0, how important each required/optional input each for explaining output. Reason is that
- examples: Optional — an array where is element is a description if an input value that can be supplied by end-user via the
propsJSON object to the end-point. The examples values be based on the values from the actual modelfeature_*input data — that way they correspond to actual real-world values. Note that most properties are auto-detected so examples can be provided automatically, more on this below.
Note that any of the feature_* inputs' explanation and examples are added automatically to the inputs object, so they don't have to be added by you to the inputs at all. You can still decide for these feature_* inputs to specify the importance — this will help end-users integration your plugin to decide if it is really necessary to supply the input props, if the implementation to supply that value is difficult.
'Auto detected' means that the related input is automatically supplied to the props of the plugin end-points, based on IP, user agent and others. This makes integration for the end-user a lot easier.
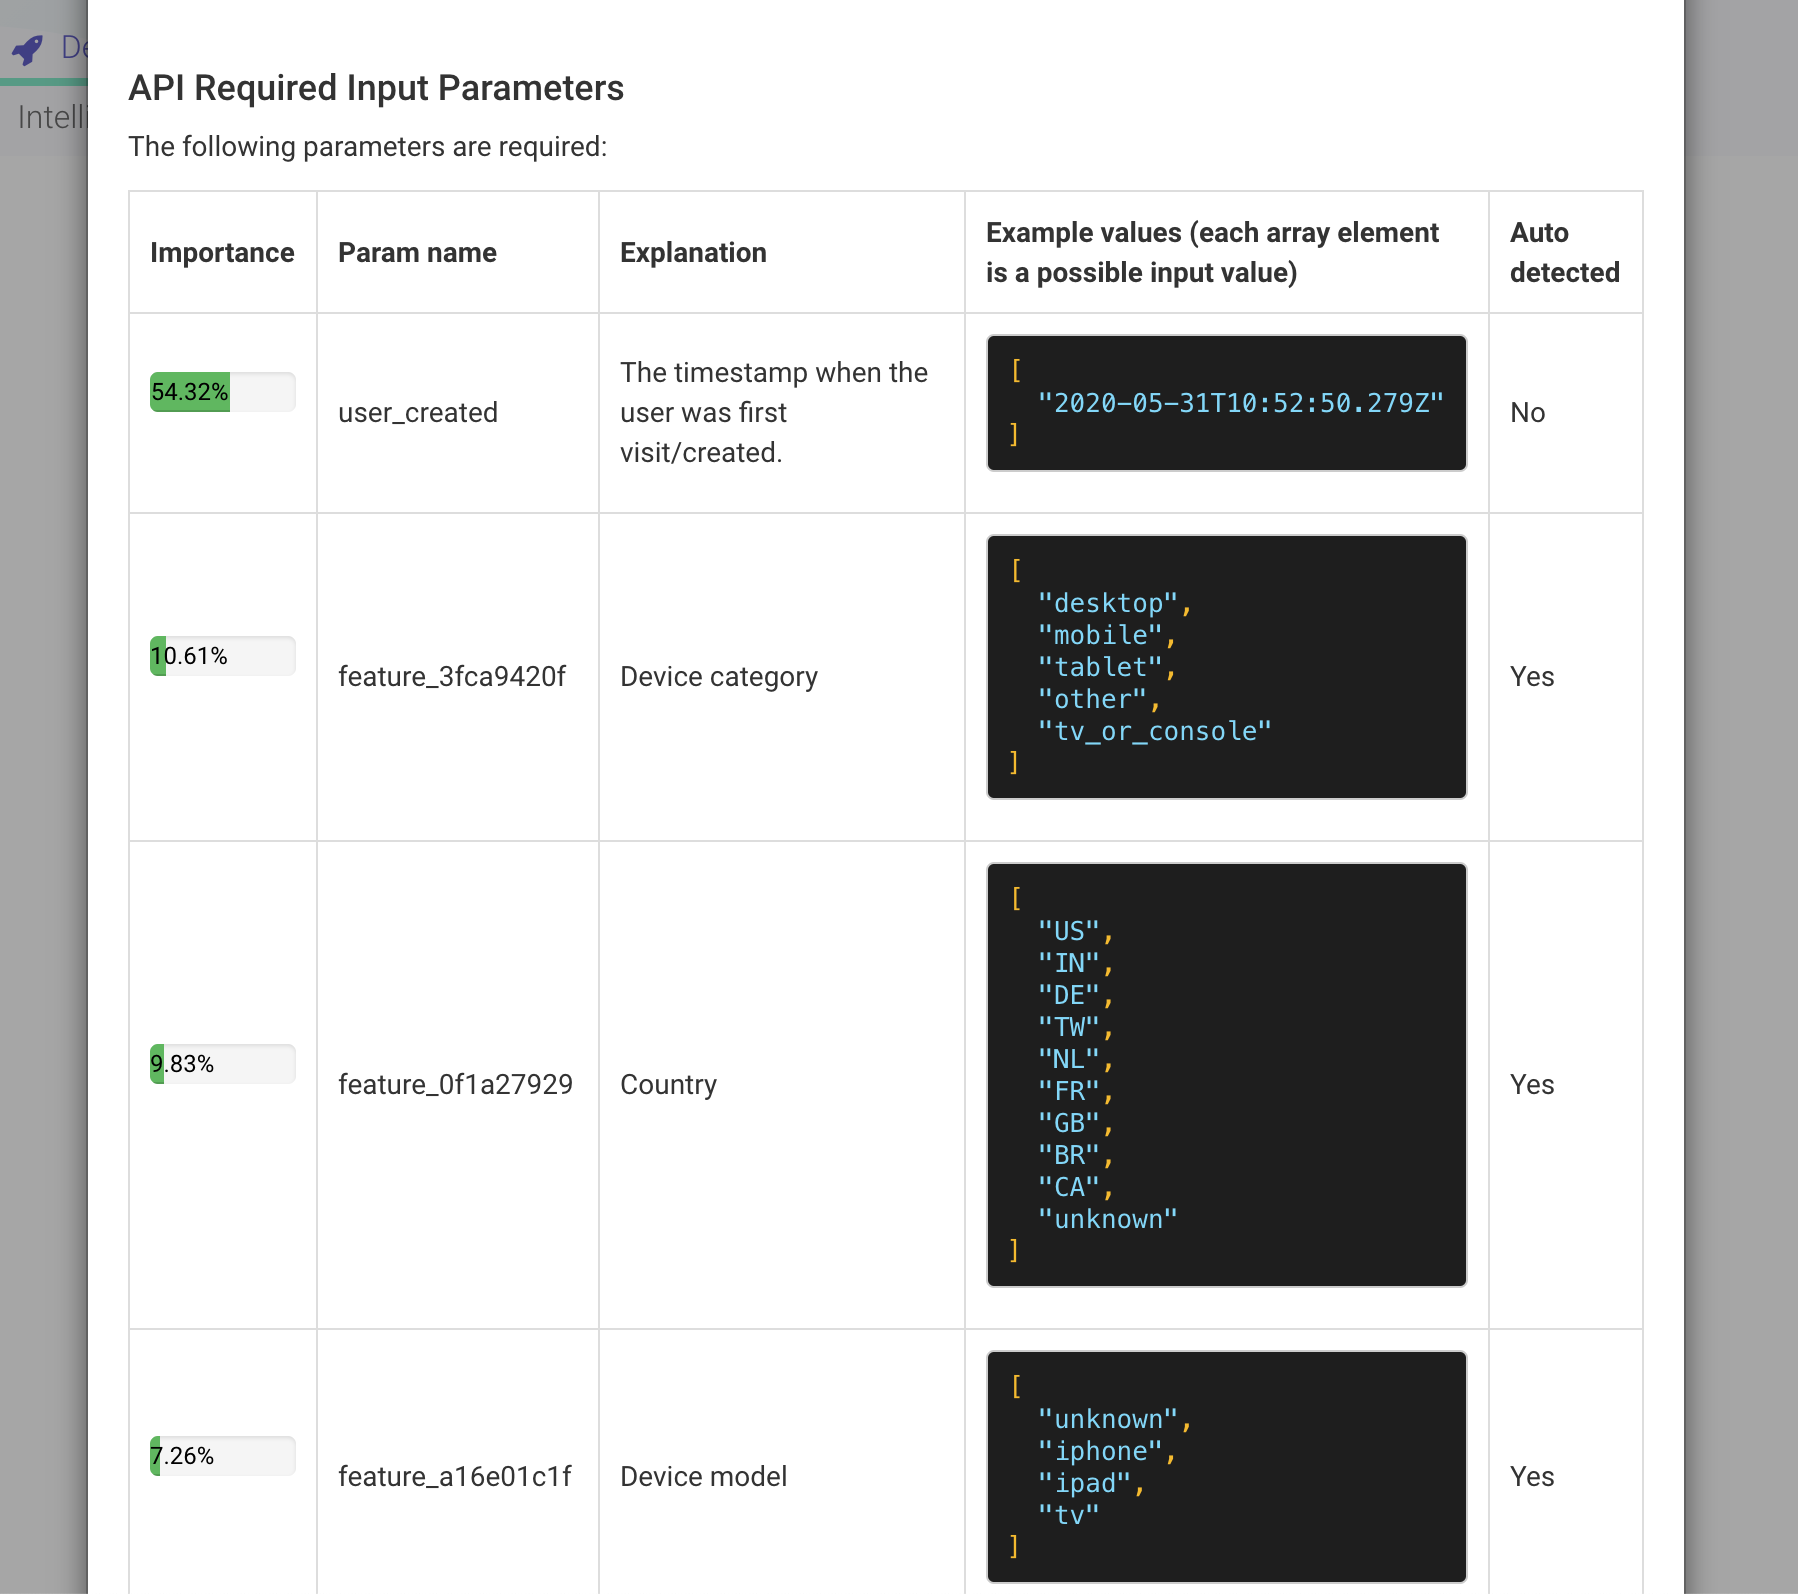
The above inputs explanations are visualized to the plugin end-user in two sections, the first one describing all required inputs:
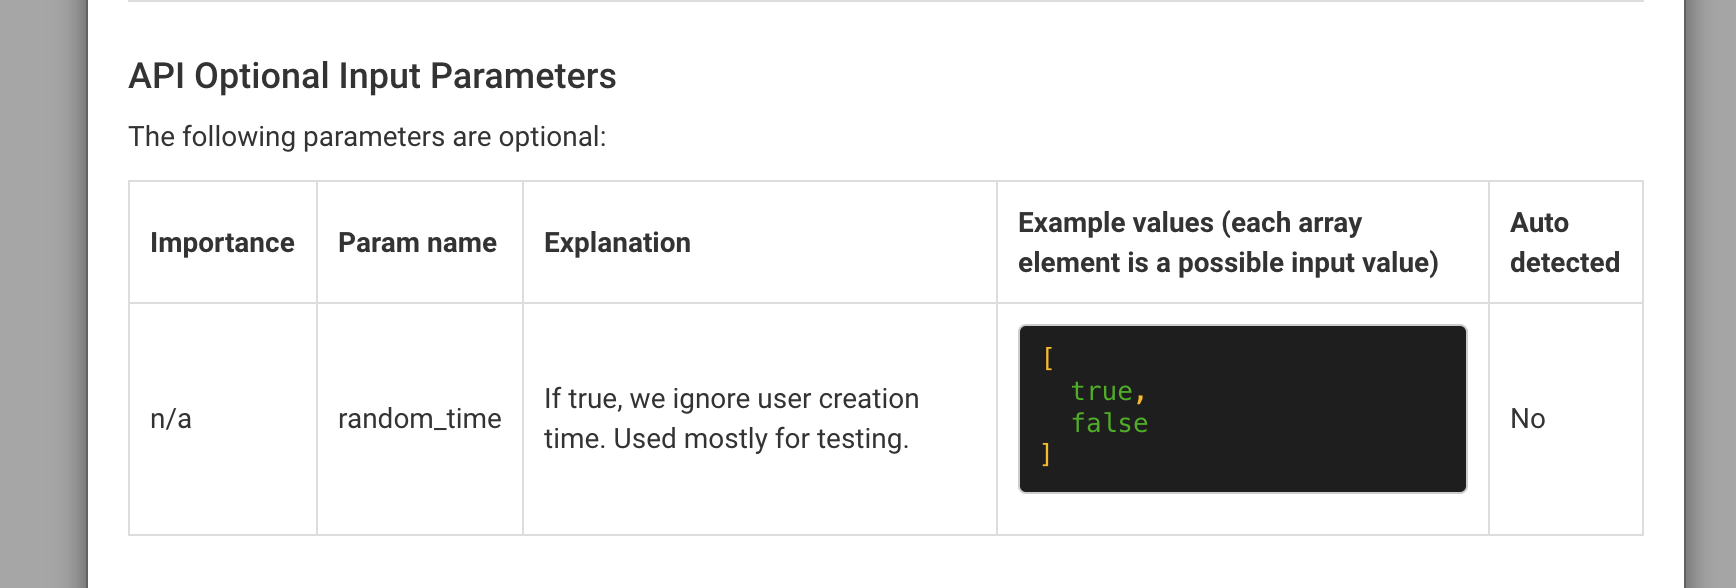
the second describing all optional inputs — those where required: false:
The last extra visualization you can make is to separate the explanations in several tabs, which can be done like the example below using two tabs.
Basically it's the same format, but now explain is an array where we have an object with title for the tab and params being the actual explain object as it was for a single tab: